Gimp Draw Smooth Circle Outline
Text and images Copyright (C) 2002 Tuomas Kuosmanen and may not exist used without permission of the writer.
Intention
The Path Tool (replacing the quondam Bezier Selection tool) can be used in many creative ways. Maybe the best thing in it is the smooth, cute curves it produces. Merely you can also use paths to create different polygonal shapes if you don't 'pull out the handles'. Polygonal shapes are specially useful when painting some geometric objects, as you can draw one side at a time (into different layers if yous want).
Shapes with Paths!?

This tutorial is nearly making uncomplicated geometrical shapes with GIMP. I will concentrate on the Path tool since I find it then useful for this purpose. I hope yous get some help and new stuff to put in your GIMP Tricks Sack :) I personally apply this technique for nigh all my work.
Notice! This is non a 'dorsum to basics' -tutorial. You should exist familiar with GIMP's dialogs and menus. I was thinking nearly this, and I did not want to make this an 'entry level' thing, basically to avert bloating this also large and duplicating other people'due south work. Paths are covered in my other tutorial, and I recommend yous to read it before going farther if yous find the cloth hither confusing. If you are new to GIMP I propose you to become to the GIMP homepage in world wide web.gimp.org and first read through the Documentation section at that place.
Permit's go started!
Kickoff we must create a new image for our cosmos. Make the size 256x256 pixels and choose RGB for the type. The paradigm groundwork should be white. During this tutorial, you volition accept to apply the Layers tab and optionally the Paths tab from the dock "Layers, Channels, Paths, Undo". This dock is present in the default GIMP installation. You can also get these tabs using Dialogs -> Layers and Dialogs -> Paths.
1. Left side

Now create a new transparent layer, and proper noun it Left_side so you know what layer I'll talk near later on. Make sure you accept the new layer active by checking the layers-dialog. If it is not selected, click the layer's name in the dialog.
Imagine the blue cube on the right side into your sheet, we'll be doing side #i now.

 Choose the Path tool and make something like the side #1 on the bluish cube, recollect most the perspective. (If this causes you trouble, don't worry. You will learn by feel).
Y'all can accommodate the points' places if you tin't get them right at the outset try, see the Path tutorial for more than information on that. Your path should look something like the one on the right.
Once you lot are satisfied with your "box", convert it to a selection using the push "Create Selection from Path" (in the Path Options dialog) or using "Choice to Path" (in the Paths tab).
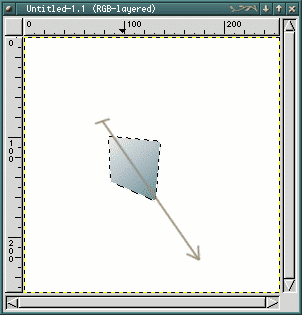
Next we must choose some dainty colors for our gradient, cull white for the foreground color and some dark-blue for the groundwork (nosotros are making a bluish box, think?) Something similar that on the image nearby.

 Select the gradient-make full tool and, starting from the top-left of the pick, 'elevate' the slope quite far down-right (see the pointer in the epitome. This mode yous get a quite light-colored face for the cube, and it is just what we want hither. We also want the lighter end of the gradient to be near our imaginative light source. (The light was coming from the left)
2. Right side
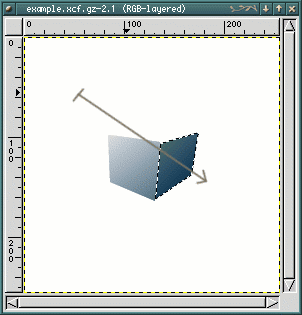
Now on to the right side, side #ii. Create a new transparent layer and name it Right_side. Use the Path Tool and endeavour to make the right side of the cube and turn it into a choice.
Take the Gradient Tool again and, still with the same colors, make a gradient from further up-left to near the pick'due south lower-right corner (run into image on right). This way we become a darker gradient suitable for the shadow-side.
Hint! Be careful with the edges. Yous don't want to get out whatsoever holes so the groundwork tin can exist seen through… It'due south better to overlap the lower layer a flake than go out a space betwixt them.
3. Top side
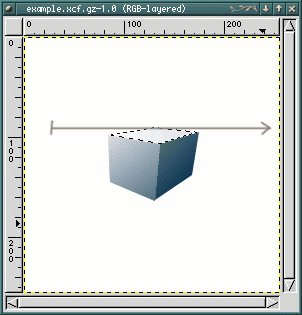
Our concluding ultimate job is to create the top, side #3. Again, create a new transparent layer and proper noun it (who quessed? :) Top_side.
At present yous probably know we desire to make nonetheless another path and this time the gradient has to exist even lighter than in the starting time side. So I suggest you lighten the nighttime blue colour a fair amount, it'south easier to get a light gradient that way. This time you pull the gradient from left to correct, according the arrow in the picture. One time y'all discover the shading look good, you can flatten the epitome and our little tutorial-cube is finished. Now utilize for your 'Cube GIMP Licence' from the nearest GIMP Station ;)
four. Finished Piece of work
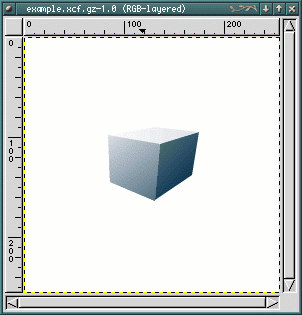
At present you have a cool image of a Calorie-free-Source-Shaded Cube. You tin can choose Image -> Flatten Image to merge the layers togerher so you tin can salve as jpeg or any other format than xcf. Or, better even so, from the layers dialog, make the background invisible and choose Image -> Merge Visible Layers and then y'all will have the background on a separate layer and you tin can work further on it if y'all similar.
The next affair is to start using the geometrical shapes every bit building blocks to brand things. And you lot can twist the beziers to make a bit more fancy stuff…
I have provided the xcf-file for the image nosotros simply created, if you want to experiment with it, although you lot should be perfectly able to do just as good yourself. Thanks for your interest.
tigert
The original tutorial can be found here. It was updated for GIMP ii.0 by Raphaël Quinet.
Source: https://www.gimp.org/tutorials/Drawing_Shapes/